Section 13: Working with the Horizon Dashboard
43. Introduction
https://www.udemy.com/course/openstack/learn/lecture/6765166#overview
Create a complete project with VMs and users
Create the Project
- Identity > Projects > [+ Create Project]
- Project Information tab
- Name: engineering_cloud
- Project Members tab
- Assign admin user as admin to the project
- [Create Project]*
- *Quota tab
- This tab does not exist in my install. I had to save the project then select [Modify Quotas] from the project’s Action drop-down option.
- Set Instance to 10
- Set Ram to 4GB (4096)
- [Save]
- Project Created!
- It will now act as a container for all of the Project related resources.
Create the Users
- Identity > Users > [+Create User]
- Name: webdeveloper
- Password: *****
- Conf Password: *****
- Project: engineering_cloud
- Role: _member_
- Can add/edit VMs
- [Create User]
Log out and Log in with webdeveloper user.
44. Requirements for Launching an Instance
https://www.udemy.com/course/openstack/learn/lecture/6765198#overview
Launching an Instance
- Connectivity (Neutron)
- Mandatory
- Needs a private network?
- Image (Glance)
- Mandatory
- Instance size [flavor] (Nova)
- Mandatory
- Security Settings
- Optional*
- ACLs (Neutron)
- Key Pair (Nova)
- Persistent storage (Cinder)
- Optional*
* Instance will boot without these.
45. Creating the Image and Flavor
https://www.udemy.com/course/openstack/learn/lecture/6765204#overview
Create Image
- Log in as webdeveloper or higher
- Project > Compute > Images > [+ Create Image]
- Image Name: cirros1
- Source Type: file
- File:
- This will either need to be on your LOCAL filesystem
- or you can point to the URL
- Format : QCOW2
- Min Disk: 1
- Min RAM: 256
- Visibility: Public
- [Create Image]
Create the Flavor
- Log in as admin to create Flavors
- Make sure you select the correct project!!
- Admin > Compute > Flavors > [+Create Flavor]
- Name: tiniest
- ID: 20
- I had an option for ‘auto’. This became:
- a5cff35c-525c-4c8a-ab6a-521785488716
- vCPUs: 1
- RAM 128
- Root Disk: 1
- [Create Flavor]
46. Network Environment for the Instance
https://www.udemy.com/course/openstack/learn/lecture/6765212#overview
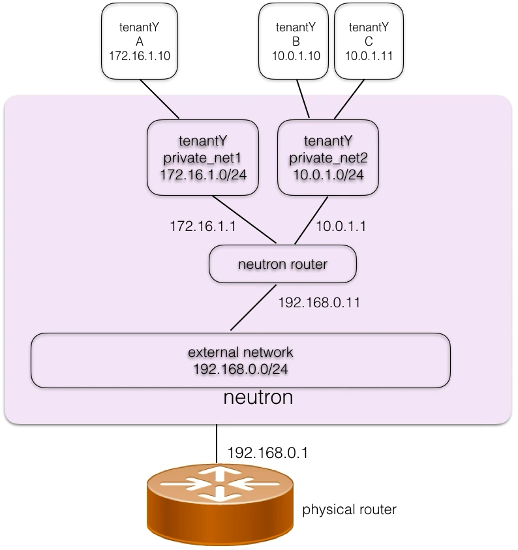
Will need NAT to provide public addresses to the private addresses. These are the Floating IP address
- 192.168.1.200 <–> 172.16.1.10
- 192.168.1.201 <–> 10.0.1.10
- 192.168.1.200 <–> 10.0.1.11
47. Setting up the Network
https://www.udemy.com/course/openstack/learn/lecture/6765220#overview
- Login with webdeveloper account
- Make sure on the engineering_cloud project
- Project > Network > Networks > [+Create Network]
- Network tab
- Name: private_net2
- [Next >>]
- Subnet tab
- Name: private_subnet2
- Network Address: 10.0.1.0/24
- Gateway IP:
- assigned automatically, leave blank
- OK to add one if you’re using something out of the ordinary
- [Next >>]
- Subnet Details tab
- [ X ] Enable DHCP
- Allocation Pools:10.0.1.10,10.0.1.50
- Use to assign a specific IP ranges available in the subnet.
- No space between IPs!
- DNS Name Servers: 8.8.8.8
- [Create]
- Network tab
Create the Provider Network
The Provider Network has already been established. This is ‘external_network’. We must have set this up during installation?
neutron net-create external_network --provider:network_type flat --provider:physical_network extnet --router:external
neutron subnet-create --name public_subnet --enable_dhcp=False --allocation-pool start=192.168.1.200,end=192.168.1.220 --gateway=192.168.1.1 external_network 192.168.1.0/24
^^ I think that happened when we performed the initial install commands.
Check network topology
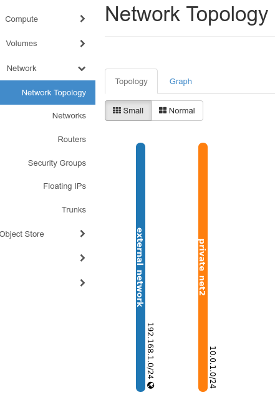
- Project > Network > Topology
- Since these are different networks, we need a router!
- [+Create Router]
- Create Router
- Router Name: r1
- External Network: Select ‘external_network’
- [Create Router]
- Add the private network to the Router
- Hover over the router icon and click [+Add Interface]
- Subnet: private_net2
- IP Address: leave this blank. Will use first available IP
- [Submit]
48. Optional Configuration
https://www.udemy.com/course/openstack/learn/lecture/6765286#overview
Instance Security & Persistent Volumes
- Security
- ssh (22)
- icmp
- Persistent Volume
- During spinup
49. Security Configuration & Instance Launch
https://www.udemy.com/course/openstack/learn/lecture/6765292#overview
Security Groups
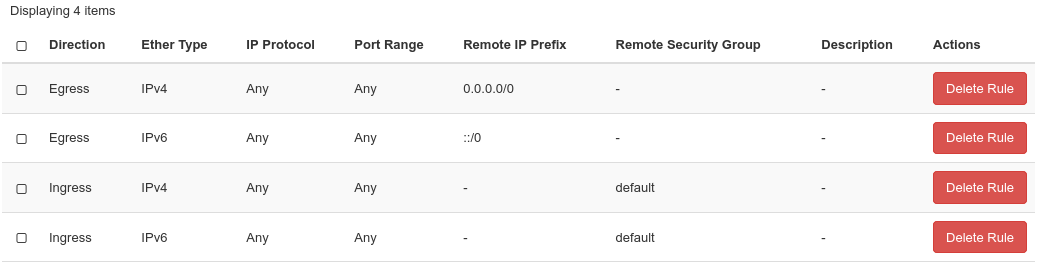
- Project > Network > Security Groups > default > [Manage Rules]
- Egress (outgoing) = 0.0.0.0/0 = everyone
- Ingress (incoming) = nada. everything blocked
- Create a Security Group
- [+Create Security Group]
- Name: securityfirst
- [Create Security Group]
- By default:
- all egress is allowed
- No ingress rules, so all traffic is dropped
- need to create incoming rules.
- Add ICMP
- [Add Rule]
- Rule: All ICMP
- Direction: Ingress
- Remote: CIDR
- CIDR: 0.0.0.0/0
- [Add]
- Add SSH
- [Add Rule]
- Rule: SSH
- Leave defaults
- [Add]
- Allow Webhosting
- [Add Rule]
- Rule: HTTP
- Restrict to Local
- CIDR: 192.168.0.0/16
- [Add]
- With the Security Group created, it can be assigned to instances as they are launched.
Key Pairs
- Project > Compute > Key Pairs > [+Create Key Pair]
- Name: myopenstackkey
- Type: SSH key
- This was not part of the video. Must be a version update.
- [Create Key Pair]
- Was immediately prompted to download the ‘myopenstackkey.pem’ file.
- Also not part of the video
- Might be a Winblows vs. Linux thing?
- Save to /home/user/.ssh/<key_name>.pem
- Was immediately prompted to download the ‘myopenstackkey.pem’ file.
Assign Floating IPs
- Project > Network > Floating IPs > [Allocate IP to Project]
- Pool: external_network
- [Allocate IP]
- Assign 2 more.
This failed. I must have missed something earlier. Moving on without testing.
Launch an Instance
- Project > Compute >Instances > [Launch Instance]
- Details
- Name: instance-a
- Availability Zone: nova
- Count: 1
- [Next >]
- Source
- Select Boot Source: Image
- Available: Select image to use by clicking Up Arrow
- [Next >]
- Flavor
- tiniest
- [Next >]
- Networks
- I’m pre-selected for private_net2. Video required selecting it.
- Audio track support this. Video showed him selecting it. 😀
- next
- I’m pre-selected for private_net2. Video required selecting it.
- Network Ports
- next
- Security Groups
- Remove Default and add ‘securityfirst’
- next
- Key Pairs
- select myopenstackkey
- [Launch Instance]
- Details
- Associate a floating IP
- Select from one allocated
- I couldn’t do this 🙁
- Select from one allocated
50. Testing and Managing the Instance
https://www.udemy.com/course/openstack/learn/lecture/6765300#overview
- Spin up another image
- Ping between the two
- set permissions on key and test
- ping floating IPs