Definitions
Cluster
A cluster is a group of Nodes that will host one or more K8s Deployments.
ConfigMap
URL endpoints for services are defined here. This allows them to change without having to reconfigure applications that call them directly. Pods then call the ConfigMap to understand where to send the data without having to rebuild the pod. You connect it to the pods so they can access the information.
These may also contain metadata such as database usernames and passwords (which may also change). Since passwords should not be stored in plain text, these should be stored as Secrets.
The data in these files can then be accessed using Environmental Variables or as a properties file.
Container
Deployment
In practice, you do not work specifically with Pods, but instead you work with deployments. Deployments are abstractions of Pods. Each deployment is a blueprint for each POD. These blueprints will contain information such as
- Number of replicas to maintain
- Scaling these numbers up or down
Note: Databases cannot be defined as Deployments because they are stateful. Ref: StatefulSets
Layers of Abstraction:
- Deployments manage Replica sets
- Replica sets manage all replicas of Pods
- Pods are an abstraction of containers.
A Deployment is as deep as a K8s admin needs to go!!
External Services
A service that is available to the public, such as a web server or API endpoint. These are, by default, accessible via the Node‘s IP address, followed by a specific port. Ex: HTTP://124.87.101.2:8080. This is good for test purposes, but not practical for production.
To use a standard domain name (Ex: HTTP://my-app.com), you will use Ingress.
Ingress
Ingress can be assigned a DNS resolvable domain. Ex: HTTP://my-app.com. These connections are then forwarded to External Services.
Internal Service
A service that is NOT available to the public (such as a direct connection to a database).
K8s
K (First letter is Upper Case) ‘u b e r n e t e’ (8 characters between the 1st and last letters in the name) s (last letter is lower case)
Namespace
Node
A node is a server (physical, virtual or some combination) that will host 1 or more Pods. Multiple nodes that support an application are grouped together in a CLUSTER.
Pod
Pods are the smallest unit in K8s. Pods are wrappers for Containers. Most pods only contain a single container, however it is possible to have more than one container if these are closely linked (Container A always requires Container B when it is deployed.)
Pods (not their containers) are assigned static IPs upon creation. If a pod crashes and a new one is created in it’s place, the new pod will be assigned a new IP, which could cause issues if another container is trying to access this one by the IP. For this reason, K8s uses Services.
Replica sets
These are automatically controlled and they manage how many replicas need to be created based on the deployment config.
Secret
Very similar to ConfigMaps, but it is used to store credentials, such as passwords and certificates. Instead of storing these in plain text, they are Base-64 encoded. Like ConfigMaps, you attached them to the Pods.
The data in these files can then be accessed using Environmental Variables or as a properties file.
Service
Services have 2 functions: Permanent IP address and Load Balancer
IP Address
Pods communicate with each other via services. A service is a static (permanent) IP that can be assigned to pods. Each service will have their own unique IP, such as a Database. Applications should use the service IP instead of the pod’s IP and traffic will automatically get routed to the pod. Since the life cycle of the pod and service are not connected, if the pod dies and a new one is created in it’s place, applications can still use the Service to talk to the pod.
Load Balancer
When a request is received, it will forward the data to whichever Pod is less busy. (Ref: Deployments)
StatefulSets
Used for managing Stateful applications, such as Databases. (MySQL, MongoDB, ElasticSearch, etc.) vs. Deployments, which are for Stateless applications.
To prevent database inconsistencies, StatefulSets control which pods are reading or writing data at any time.
Like Deployments, StatefulSets control the number of database replicas as well as scaling these numbers up or down.
Note: Deploying StatefulSets can be tricky! As such, most databases are actually hosted OUTSIDE of the K8s cluster and only use K8s for applications that are stateless and can scale accordingly.
Volumes
Since Pods are ephemeral and can be killed and restarted up upon demand, any data that exists on them would be lost as soon as the pod dies. Since database, log and other data must persist reliably, volumes are used. Volumes attach physical storage to your pods. The volume may reside on the local Node where the pod is running, or it may be remote, including somewhere else in the cluster, cloud storage, or other storage outside of the cluster, such as a SAN.
Think of a Volume as an external hard drive plugged into the cluster.
Note: K8s does not manage the data. The Administrator is responsible for all backups, data replication, etc.
Architecture
Worker Nodes
- Worker Nodes do the actual work. There may be hundreds of these!
- Each node can run multiple PODS
- 3 processes must be installed on each worker node:
- Container Runtime: Docker usually, but can be something else.
- This is external to K8s.
- Kubelet: Schedules pods (and subsequently the containers in them)
- Interacts with both the container runtime and the node.
- Starts the pods with the containers inside.
- Assigns resources from the node to the containers, such as CPU, RAM, Storage resources, etc.
- Kube Proxy
- Forwards communications between Pods.
- High Performance. Will try to keep communications within the same Node whenever possible.
- This reduces network loads.
- Container Runtime: Docker usually, but can be something else.
Master Nodes
- Master Nodes are used to manage the cluster.
- Should have 2 min for High Availability.
- 4 processes on every Master Node
- API Server
- Load balanced between multiple Master Nodes.
- This is the cluster gateway.
- This could be an external process, such as a UI, API client, Kubectl command line, etc.
- Configurations, such as updates, or queries about the cluster’s health, are handled via the API Server
- Acts as a gatekeeper for authentication!
- Only authorized requests get through to the cluster.
- All requests must go through the API server, which
- Validates the request and forwards it on to the other processes.
- Makes security somewhat easier because there is only 1 entry point.
- Scheduler
- Used to decide where to create Pods.
- Has intelligence to determine which Worker Node new pods should be deployed on.
- Based on available resources, etc.
- Scheduler DOES NOT actually create the new Pods, that is handled by the Worker Node’s Kubelet process.
- Controller Manager
- Detects cluster state changes. Watches for Nodes and Pods that die and reschedules them as quickly as possible.
- Passes this data to the Scheduler to determine where to spin up the new Pods.
- ectd
- The cluster brain! A key->value store.
- Shared storage when using with multiple Master Nodes.
- All K8s Master Processes talk to ectd.
- Any time a Node or Pod is added, the changes are stored here.
- Actual application data (such as app logs, database data, etc.) are NOT stored here!
- API Server
Example Setup
- 2 Master Nodes
- More important than Worker Nodes, but require fewer resources.
- 3 Worker Nodes
Minikube and Kubectl
Minikube
- Setting up a test environment on a local machine would be difficult to setup as defined in the Example Setup above. (2 MN, 3 WN)
- Minikube is Open Source single-node cluster that runs in VirtualBox.
- Master processes and Worker processes all run on the same host.
- Docker container runtime will be pre-installed.
Kubectl
- Command line tool for K8s clusters
- All configurations must go through API Server
- Kubectl is the most powerful of all API Server clients.
- You can do anything you want with Kubectl!
- Kubectl talks to API Server which controls everything else. (Create services, add Nodes, create/destroy pods, etc.)
- Not limited to Minikube. This is ‘the’ tool to use for any type of cluster!
Installation (0:39:00)
Followed instructions from here: https://www.youtube.com/watch?v=d-io3hKFdWs
Install Minikube
- Followed instructions from here: https://www.youtube.com/watch?v=d-io3hKFdWs
- Installs directly on a running Linux VM
- Requires:
- Docker is pre-installed
- User is member of the docker group
sudo usermod -aG docker $USER
sudo apt update
sudo apt upgrade -y
curl -LO https://storage.googleapis.com/minikube/releases/latest/minikube-linux-amd64
sudo install minikube-linux-amd64 /usr/local/bin/minikube

# Verify it installed
minikube version
Install kubectl
curl -LO https://storage.googleapis.com/kubernetes-release/release/`curl -s https://storage.googleapis.com/kubernetes-release/release/stable.txt`/bin/linux/amd64/kubectl
# make executable and move
chmod +x kubectl
sudo mv kubectl /usr/local/bin

# Verify it installed
kubectl version -o yaml
Start the cluster
minikube start --driver=docker

# Verify the status
minikube status
Basic kubectl commands
General
# Help
kubectl -h

# Create anything help
kubectl create -h
Cluster Commands
Get Everything
kubectl get all
Get basic info
kubectl cluster-info
Check cluster nodes
kubectl get nodes
Check services
kubectl get services
Node Commands
Check cluster nodes
kubectl get nodes
Deployment/Pod Commands
Note: Pretty much all creation/deletion/editing is done at the Deployment level. The rest is really just looking at things.
Create a Deployment
Use this for creating Pods!
kubectl create deployment <DEPLOYMENT_NAME> --image=<DOCKER_IMAGE_NAME> [--dry-run] [OTHER_OPTIONS]

Example:
kubectl create deployment nginx-depl --image=nginx
# Check the details
# This will take about a minute to fully spin up
kubectl get pod
NAME                        READY STATUS  RESTARTS AGE
nginx-depl-5fcbf6fffd-zxhkr 1/1   Running 0        51s
#deploy_name-replica_set_id-pod_id
Delete a Deployment
kubectl delete deployment <DEPLOYMENT_NAME>
Edit a Deployment
kubectl edit deployment <NAME>

# Example
kubectl edit deployment nginx-depl
Interact with the pod (CLI Terminal)
- `-it` = Interactive Terminal
kubectl exec -it <POD_NAME> -- bin/bash
Logs
kubectl logs <POD_NAME>

Example:
kubectl logs nginx-depl-5fcbf6fffd-zxhkr
View Deployments
kubectl get deployments
View Pods
kubectl get pod
View Pod Status
kubectl describe pod <POD_NAME>
View Replica Sets
kubectl get replicaset
Using Configuration Files
0:56:28
Exclusive use of the CLI is not scalable. In practice, you’ll use config files. To do this, use the ‘apply’ command.
kubectl apply -f <FILENAME>

Example
kubectl apply -f nginx-deployment.yaml
You can also delete configurations
kubectl delete -f <FILENAME>
Simple deployment config example:
Deployment Example: nginx-depl.yaml
apiVersion: apps/v1
kind: Deployment
metadata:
name: nginx-depl
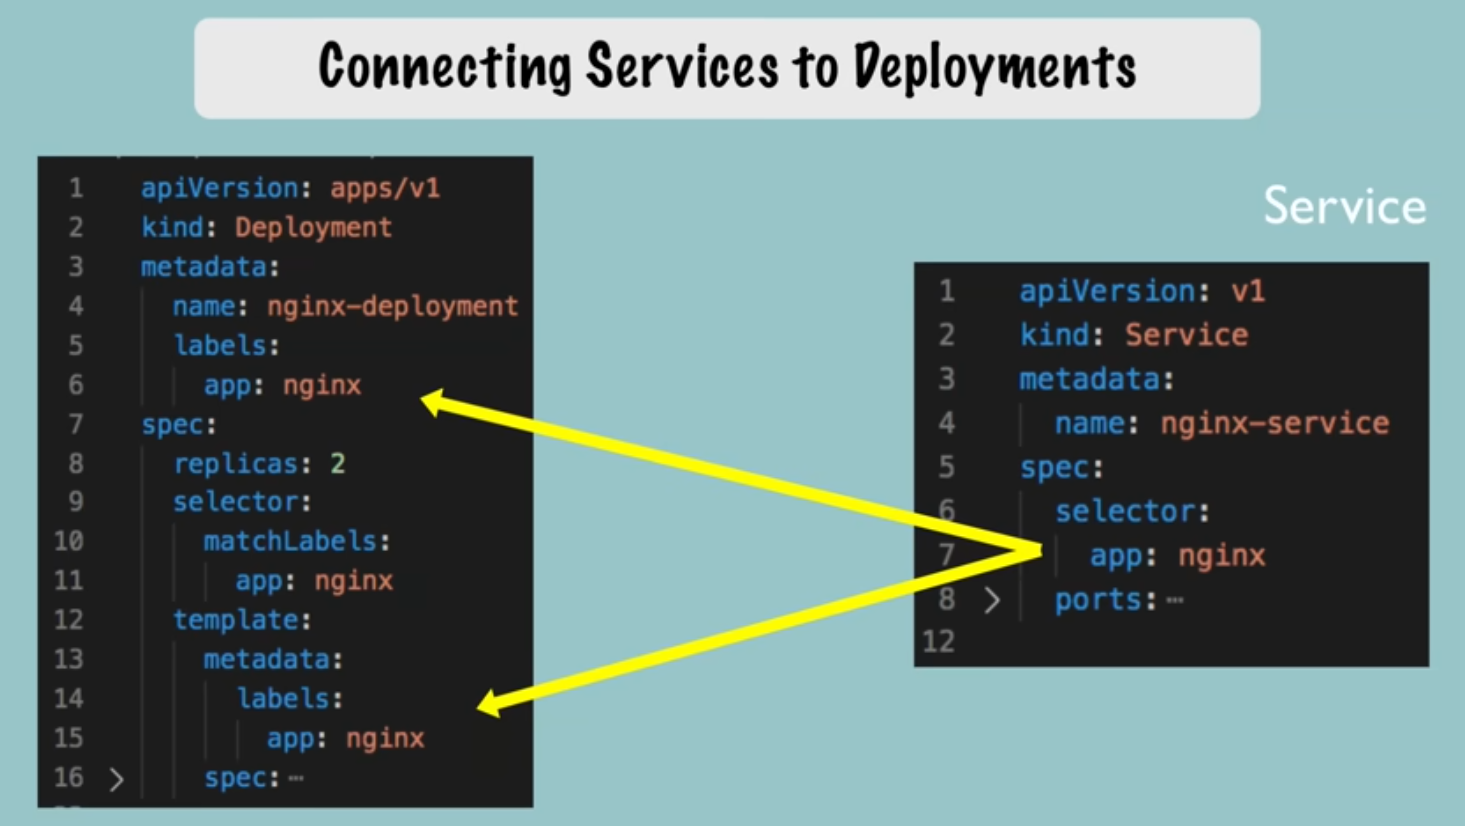
labels: # These are used by Services to identify which deployments belong to a service.
app: nginx
spec: # Specification for the Deployment
replicas: 1
selector:
matchLabels: # This is how K8s identifies which Pods belong to this deployment
app: nginx
template:
metadata:
labels: # These will be 'matched' with matchLabels above.
app: nginx
spec: # Specification for the Pod (aka Pod Blueprint)
containers:
- name: nginx # Only 1 container in the Pod, but could have more!
image: nginx:1.16
ports:
- containerPort: 8080
Service Example: nginx-service.yaml
apiVersion: v1
kind: Service
metadata:
  name: nginx-service
spec: # Specification for the Deployment
  selector:
    app: nginx
  ports:
    - protocol: TCP
      port: 80
      targetPort: 8080
Apply the configuration
kubectl apply -f nginx-depl.yaml
Things to consider:
- You cannot apply a configuration file to a deployment that was configured via
kubectl create deployment .... You will need to delete the deployment first. - Once a deployment has been created using a config file, you may simply update the file then rerun the apply command to perform updates.
- Configurations files should be stored with your code, or in their own git repository.
Understanding K8s YAML configuration files
1:02:00
Deployment Example:
apiVersion: apps/v1
kind: Deployment
metadata:
  name: nginx-depl
  labels: ...
spec:
  replicas: 1
  selector: ...
  template: ...
Service Example:
apiVersion: v1
kind: Service
metadata:
  name: nginx-service
spec:
  selector: ...
  template: ...
Three parts to a K8s config (Excluding the header)
Not counted: Header.
- apiVersion:
- Note: Each component may have a different apiVersion
- kind: Defines what you are creating
- metadata:
- Will include the name
- spec: # Specification
- These attributes will be specific to the ‘kind’ of deployment being created.
- status:
- This part is automatically created by K8s.
- DO NOT include this in your config file!!
- K8s looks at the desired state (status) and compares to the actual state to see if something needs to be fixed.
- This data comes from etcd.
- This part is automatically created by K8s.
Connecting Components (Labels, Selectors & Ports)
Labels
- Always part of metadata
- Any key: value pair you can think of (Does not have to be ‘app’ as shown in previous examples
- Reference the Simple Config comments above for more info.
Ports
- A container’s
containerPortmust equal the Service’stargetPort.
Service Example:
spec:
  ports:
    - protocol: TCP
      port: 80 #Incoming port
      targetPort: 8080 #Forward from the incoming port to the port on the container.
Deployment Example:
spec: # Deployment specs
  template:
    spec: # Pod specs
      containers:
      - name:
        ...
        ports:
        - containerPort: 8080 # Worker Node's targetPort
Deploy them both
kubectl apply -f nginx-depl.yaml
kubectl apply -f nginx-service.yaml
Verify the relationships
kubectl get service
kubectl describe service nginx-service

# look for this....
Endpoints: 10.20.30.40:8080, 10.20.30.41:8080
Verify we have the correct Pod IPs
- -o = output
kubectl get pod -o wide

Example output:
NAME                        READY STATUS  RESTARTS AGE   IP          NODE ...
nginx-depl-7f5cf9f489-62vtg 1/1   Running 0        9m17s 10.20.30.40 minikube ...
nginx-depl-7f5cf9f489-v9bxn 1/1   Running 0        9m17s 10.20.30.41 minikube ...
View the status (automatically added by K8s!)
kubectl get deployment nginx-depl -o yaml
kubectl get deployment nginx-depl -o yaml > output-file.yaml
Note: You should probably not use this file as a deployment file. If you do, you will need to strip out a lot of metadata that was automatically added besides just the status data, such as creation times, Ids, etc.
Complete Application Setup with K8s Components
1:16:19
Create the Deployments
Note: SECRET files must be created (or at least executed) BEFORE running any files that reference them.
- To view the conf data for mongodb: https://hub.docker.com Search ‘mongodb’
- Port: 27017
- Environmental Variables:
- MONGO_INITDB_ROOT_USERNAME
- MONGO_INITDB_ROOT_PASSWORD
- We’ll pull these values from a SECRET!
mongo-deployment.yaml
apiVersion: apps/v1
kind: Deployment
metadata:
  name: mongodb-depl
  labels:
    app: mongodb
spec: # Specification for the Deployment
  replicas: 1
  selector:
    matchLabels:
      app: mongodb
  template:
    metadata:
      labels:
        app: mongodb
    spec: # Specification for the Pod
      containers:
      - name: mongodb # Only 1 container in the Pod, but could have more!
        image: mongo
        ports:
        - containerPort: 27017
        env:
        - name: MONGO_INITDB_ROOT_USERNAME
          valueFrom:
            secretKeyRef:
              name: mongodb-secret
              key: mongo-root-username
        - name: MONGO_INITDB_ROOT_PASSWORD
          valueFrom:
            secretKeyRef:
              name: mongodb-secret
              key: mongo-root-password
Create the SECRETS file
Note: To base64 encode the username and password, use echo -n '<MY_SECRET>' | base64
- This example uses `username` and `password` respectively.
mongo-secret.yaml
apiVersion: v1
kind: Secret
metadata:
  name: mongodb-secret
type: Opaque
data:
  mongo-root-username: dXNlcm5hbWU=
  mongo-root-password: cGFzc3dvcmQ=
Apply the secret
kubectl apply -f mongo-secret.yaml
Verify the secret has been created
kubectl get secret
Create the deployment
kubectl apply -f mongodb-deployment.yaml
Create the service
Services and Deployments are usually bound together, so they can be combined in the same file. To do this, just add a line consisting of 3 consecutive hyphens, which informs the YAML processor that this starts a new file.
---
apiVersion: v1
kind: Service
metadata:
  name: mongodb-service
spec:
  selector:
    app: mongodb
  ports:
  - protocol: TCP
    port: 27017
    targetPort: 27017
Verify the service is running
Note: This will also show the IP(s) of any pods attached to it.
kubectl describe service mongodb-service
You can then verify this IP matches the IP of your Pod.
kubectl get pod -o wide
Create the Mongo Express Deployment and Service
1:33:24
Create the ConfigMap for the DB so the application can locate it. This time, we’re creating it first. 🙂
mongo-configmap.yaml
apiVersion: v1
kind: ConfigMap
metadata:
  name: mongodb-configmap
data:
  database_url: mongodb-service # This is the service name
mongo-express.yaml
Note: Mongo Express has been updated since the video. As such, you need to specify image mongo-express:0.54.0 instead of the most recent version.
apiVersion: apps/v1
kind: Deployment
metadata:
  name: mongo-express
  labels:
    app: mongo-express
spec: # Specification for the Deployment
  replicas: 1
  selector:
    matchLabels:
      app: mongo-express
template: # Blueprint for Pods
  metadata:
    labels:
      app: mongo-express
  spec: # Specification for the Pod
    containers:
    - name: mongo-express # Only 1 container in the Pod, but could have more!
      image: mongo-express:0.54.0
      ports:
      - containerPort: 8081
     env:
     - name: ME_CONFIG_MONGODB_ADMINUSERNAME
       valueFrom:
         secretKeyRef:
           name: mongodb-secret
           key: mongo-root-username
     - name: ME_CONFIG_MONGODB_ADMINPASSWORD
       valueFrom:
         secretKeyRef:
           name: mongodb-secret
           key: mongo-root-password
     - name: ME_CONFIG_MONGODB_SERVER
       valueFrom:
         configMapKeyRef:
           name: mongodb-configmap
           key: database_url
Apply the ConfigMap and the Deployment
kubectl apply -f mongo-configmap.yaml
kubectl apply -f mongo-express.yaml
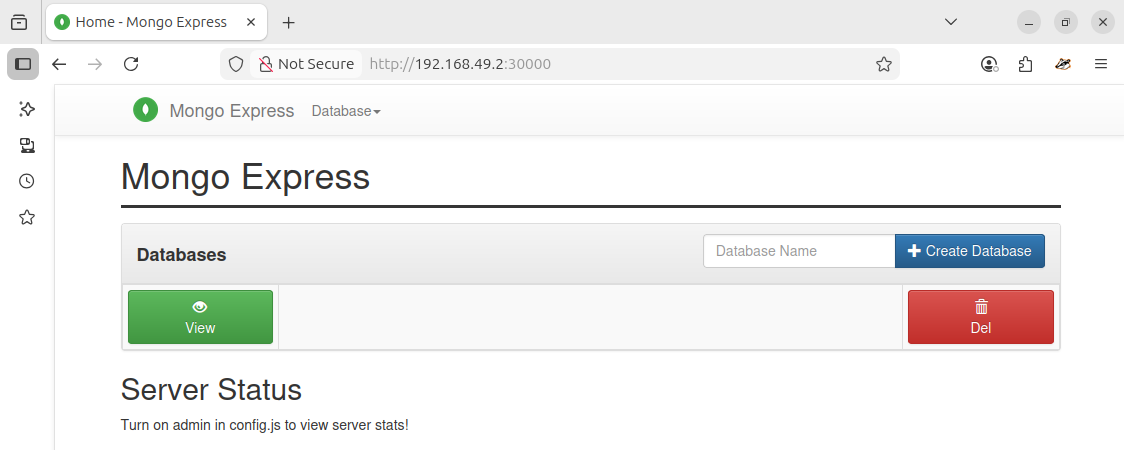
Verify all Pods are running and get the ID of the Express Pod
kubectl get pods
Verify the database actually connected
kubectl logs <mongo-express pod>
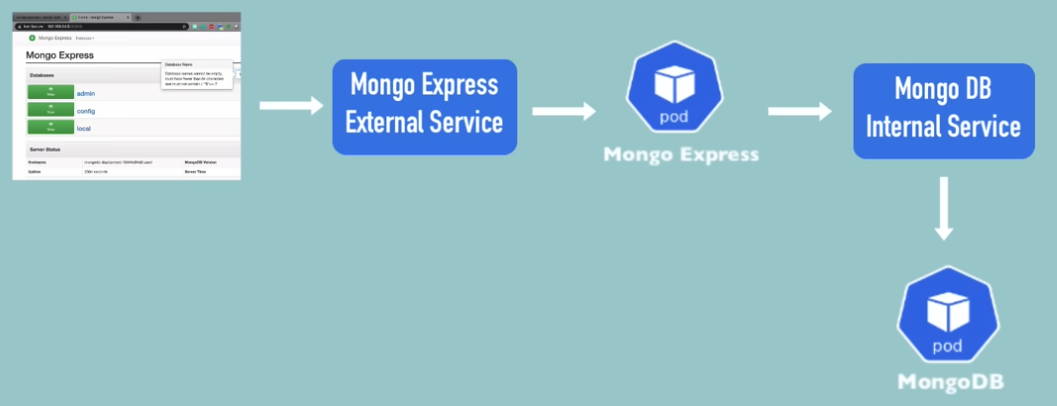
Create the External Service to connect to Mongo Express from a browser
We’ll add this to the end of the Deployment Service.
Notes:
- Added
type: LoadBalancerunder the spec. Poor wording since all Services are load balancers (including internal). - Added `nodePort: 30000` to the Port definition. This value must be between 30000 and 32767.
apiVersion: v1
kind: Service
metadata:
  name: mongo-express-service
spec:
  selector:
    app: mongo-express
  type: LoadBalancer
  ports:
  - protocol: TCP
    port: 8081
    targetPort: 8081
    nodePort: 30000
Apply the update
kubectl apply -f mongo-express.yaml
You can see the service is external by viewing the new service’s TYPE = LoadBalancer
- Type ClusterIP (aka Internal Service) is default, so this does not need to be defined.
kubectl get service
---
NAME                  TYPE         CLUSTER-IP     EXTERNAL-IP PORT(S)        AGE
kubernetes            ClusterIP    10.96.0.1      <none>      443/TCP        22h
mongo-express-service LoadBalancer 10.96.8.15     <pending>   8081:30000/TCP 50s
mongodb-service       ClusterIP    10.108.118.248 <none>      27017/TCP      20h
Because this is Minikube, the external IP works a bit different. If this was a standard K8s deployment, the IP address would be assigned.
minikube service mongo-express-service
---
┌───────────┬───────────────────────┬─────────────┬───────────────────────────┐
│ NAMESPACE │ NAME                  │ TARGET PORT │ URL                       │
├───────────┼───────────────────────┼─────────────┼───────────────────────────┤
│ default   │ mongo-express-service │ 8081        │ http://192.168.49.2:30000 │
└───────────┴───────────────────────┴─────────────┴───────────────────────────┘
K8s Namespaces
1:46:16
- Resources are organized into Namespaces.
- Think of Namespaces as virtual clusters inside a cluster.
- 4 Namespaces created by default: `kubectl get namespace`
kubectl get namespace
---
NAME            STATUS AGE
default         Active 23h
kube-node-lease Active 23h
kube-public     Active 23h
kube-system     Active 23h
default:
- Where all resources go by default if you have not created a custom namespace.
kube-node-lease:
- Contains information re: heartbeats of nodes.
- Each node has an associated lease object in the namespace.
- This is used to determine the availability of the node.
kube-public:
- Publicly Accessible data.
- A configmap containing cluster info.
kubectl cluster-info
kube-system:
- Internal Only! Do not user or modify anything in this namespace!
- These are system process and processes for kubectl, etc.
Creating a namespace
kubectl create namespace <NAMESPACE_NAME>
kubectl get namespace
Creating with a Configuration file
This is a better way. This will maintain a history of what resources you created in a cluster in your config file repository.
apiVersion: v1
kind: ConfigMap
metadata:
  name: my-configmap
  namespace: my-namespace
data:
  my_data: blahblahblah
Why use Namespaces?
Without namespaces, everything gets clumped into the default. this makes it hard if not impossible to sort resources.
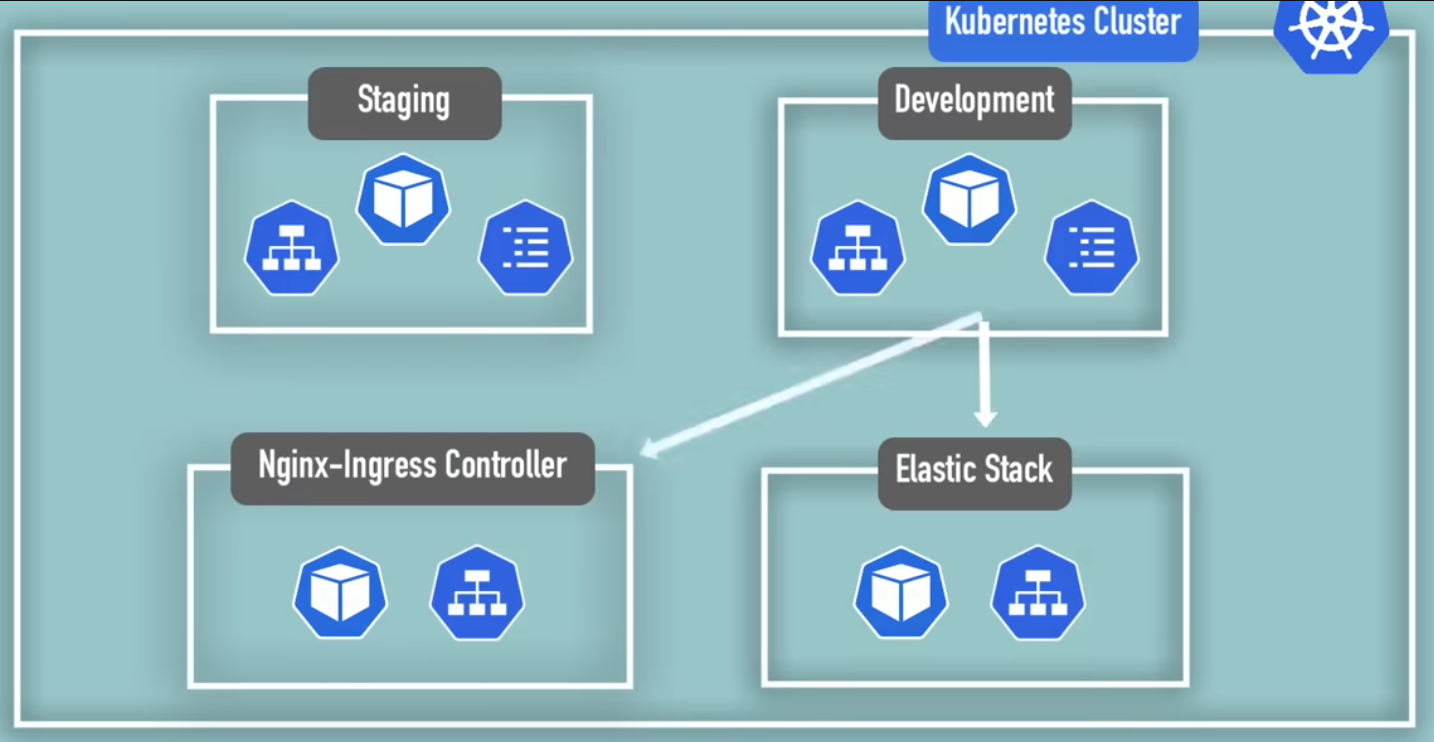
- Better organization. Group resources into their own namespaces, such as Databases.
- Database resources
- Elastic Search resources
- NginX …
- Multiple Teams using the same cluster
- Allows multiple teams to use the same deployment name with different resources, configurations, etc.
- Prevents teams from overriding each other
- Allows multiple teams to use the same deployment name with different resources, configurations, etc.
- Hosting Staging and Development in the same cluster
- Both systems can share pre-defined resources, such as a database.
- Blue / Green Deployments
- Two versions of Production – Active, current version and Future upgraded version.
- Like above, they can share common resources.
- Limit resources
- Assign team access to ONLY their namespace! This prevents accidental overrides.
- Each team gets their own isolated environment.
- Resource Quotas allow you to limit the resources (CPU/RAM/Storage) per Namespace.
Characteristics of a Namespace
1:55:07
Shared and Unshared Resources
kubectl api-resources --namespaced=true #bound to a namespace
kubectl api-resources --namespaced=false #available cluster wide
- Most cannot be shared.
- ConfigMaps
- Secrets
- Services CAN be shared!
- When referencing the service from the local config map, use the namespace name at the end of the service name.
apiVersion: v1
kind: ConfigMap
metadata:
  name: my-local-configmap
data:
  db_url: db-service.namespace
Components that do not live in Namespaces. (These live globally in the cluster)
- Volumes
- Nodes
Creating components in a Namespace
By default, all components created will be in the `default` namespace. You must identify the namespace to add the components to.
1. Identify the desired namespace in the create command
kubectl apply -f filename.yaml --namespace <NAMESPACE>
2. (Better) Identify the desired namespace in the configuration file.
apiVersion: v1
kind: ConfigMap
metadata:
  name: my-local-configmap
  namespace: my-namespace
data:
Important! When locating a component in a non-default namespace, you MUST identify the desired namespace in the command. Failure to do this will show from the default namespace only!!
kubectl get configmap -n my-namespace
Setting a non-default namespace
This requires a 3rd party tool such as kubectx / kubens
This may also be possible now via kubectl… Untested
kubectl config set-context --current --namespace=NAMESPACE
K8s Ingress Explained
2:01:52
Allows users to access the application without using an external service that requires the IP of the Node and the application port.
- Ingress forwards to the Internal Service, which then forwards to the Pod.
Internal Service definition
apiVersion: v1
kind: Service
metadata:
  name: my-internal-service
spec:
  selector:
    app: mongo-express
  type: LoadBalancer
  ports:
  - protocol: TCP
    port: 8080
    targetPort: 8080
    nodePort: 30000 #30000 - 32767
Note: No Node or Type (default ClusterIp) definitions here.
Ingress Definition
apiVersion: networking.k8s.io/v1beta1
kind: Ingress
metadata:
  name: my-app-ingress
spec:
  rules:
  - host: my-app.com # Must be a valid domain name. Map to the IP of the Ingress Node
    http:
      paths: # everything after the domain
      - backend:
          serviceName: myapp-internal-service # Internal Service Name
          servicePort: 8080 #Internal service port
Ingress Controller
2:07:40
Limited notes going forward…
- Using Proxy servers
- Subdomains vs. Paths
- TLS Certificates
Helm – Package manager of K8s
2:24:17
Finding packages
helm search <PACKAGE>
- Do we have one for Virtana CO?
- Might be a private registery
Template Engine
Similar configs. Use {{ }} to replace variables with values.
values.yaml
2:30:55
Release Management
2:26:00
Volumes
2:38:08
Rewatch this, although I don’t think this included much meat.
StatefulSets
2:58:38
StatefulSets are a K8s component used specifically for stateful applications.
- Deployed using StatefulSet
- Depend on the most up-to-date information.
- Track their data using some persistent storage.
- Databases
- MySQL
- MongoDB
- ElasticSearch
- Any Application that stores data to keep track of its state.
Stateless Applications
- Deployed using Deployments
- Easy replication within the cluster
- Do not keep records of previous interactions.
- They simply process code and are just pass-throughs for data updates.
- Each request is completely independent of any other.
- All data required to process the request must be included with the request!
Differences between StatefulSets and Deployments
Similarities
- Identical Pod replications
- Configuration of storage
Differences
- Deployments
- Completely interchangeable. One dies, any other can just take over.
- Created in random orders with random hashes (IDs)
- One service that load balances to any of them.
- Deleted or scaled down in random orders
- StatefulSets
- Replica Pods are NOT identical!
- They get their own identity above the Pod blueprint
- This is the difference between Deployments and StatefulSets
- Cannot be created/deleted at the same time
- Cannot be randomly addressed
- Replica Pods are NOT identical!
Pod Identities
- Sticky identity for each Pod.
- mysql-0, mysql-1, mysql-2, etc.
- <StatefulSet_Name>-<Ordinal>
- Ordinal starts from 0 and increments by 1 for each replica.
- Each Pod gets its own DNS name
- mysql-0.svc2, mysql-1.svc2, etc.
- When a Pod is restarted:
- It will get a new IP (Same as any other Pod)
- Pod ID will remain the same
- DNS Name will remain the same (but will point to the new IP)
- Created from same spec, but NOT interchangeable
- Persistent ID remains across rescheduling.
- When a Pod dies and is replaced, it keeps its ID.
- Pods can only replicate if the previous Pod is up and running!
- Example: If on initial deployment, the Master fails to deploy, no replicas will be created!
Scaling Databases – Overview
- With a single instance, it both reads and writes.
- With multiple instances, one 1 (Master) can read and write. Others (Slaves/Workers) can only read.
- Each Pod has access to different physical storage.
- Each get their own replica of the storage
- ID-0: /data/vol/pv-0 (Master)
- ID-1: /data/vol/pv-1 (Worker)
- ID-2: /data/vol/pv-2 (Worker)
- For this to work, data must be continuously synchronized.
- Workers must know about each change so they can remain up to date.
- Master updates data. Workers update their own data.
- When adding a new replica (Pod) [ID-3]:
- Pod must create its own storage
- Clone all existing data.
- This happens from the previous Pod (ID-2)
- Continues syncing from Master
- Each get their own replica of the storage
- Scaling Down
- Always scale in reverse order.
- The last Pod created (Highest Ordinal) is deleted first,
- Then the next oldest…
- Always scale in reverse order.
More about Storage
- Interesting Note: Temporary Data
- It IS possible to do this without persistent storage and only using the storage available to the Pods.
- Replication, Sychronization will still work.
- Caveat: All data will be lost when all Pods die, or Cluster crashes, etc.!!
- All Pods die at the same time….
- With Persistent storage, all data will survive, even if all Pods die.
- Storage lifecycle not controlled by Pod state.
- Each storage contains data about:
- The Pod’s ‘State’
- Whether is a Master or Slave
- When a Pod is rebuilt, it gets re-attached to its original storage.
- for example, the Master remains the Master.
- This is why StatefulSets should ONLY use Remote Storage
- If a Node dies, so does the local storage!
Replicating Stateful Apps.
It’s Complicated!
- Kubernetes helps you, but there is A LOT of manual work required.
- Need to configure cloning and data synchronization.
- Make Remote storage available
- Managing storage and Backups.
- As such, K8s (or any containerized environment) is not well suited for Stateful Apps.
- K8s is amazing for Stateless apps.
K8s Services
3:13:42
What is a service and why do we need it?
- Pods are ephemeral – destroyed frequently!
- Restarts get new IP addresses.
- Addressing via hard coded IP address would require constant software updates!
- Services get a stable, static IP.
- This keeps fluidity both Internally and Externally
- Services offer LoadBalancing automatically.
4 types of Services
- ClusterIP
- Default. No ‘type:’ required
- Think of a Service as a Load Balancer, with a static IP and Port.
- Pod IP comes from range available on the Node.
- Node0: 10.2.0.x
- Node1: 10.2.1.x
- NodePort
- type: NodePort
- Is an extension of ClusterIP type.
- Not recommended. Insecure.
- Better to use LoadBalancer
- Creates a service that allows External traffic on a static Port to each worker node.
- Instead of Ingress, The browser can access the service on a node via the Port defined.
- Node Port Range: 30000 – 32676
- Must also define the `nodePort` value in the spec: ports: list.
- type: NodePort
- Headless
- Also default ‘type’ of ClusterIP
- How to talk to a specific Pod without going through the Service?
- Stateful apps? Maybe need to talk to a DB Master to make a change to a DB?
- `spec: {clusterIp: None}` will return the PodIp when making a dns call
- LoadBalancer
- type: LoadBalancer
- Is an extension of NodePort type