Part 1 – Getting Setup
https://www.udemy.com/aws-certified-solutions-architect-associate/learn/v4/t/lecture/5028334?start=15
- Set Region to US-East
- Identity and Access Management (IAM)
- Create a Role for S3 administrative access
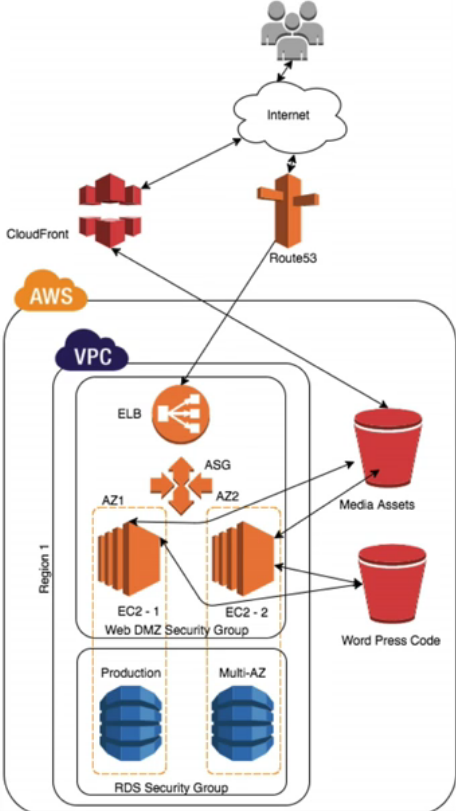
- Create our Security Groups
- Put these in your default VPC
- Networking > VPC > Security Groups
- Web-DMZ
- HTTP (80)
- SSH (22)
- 0.0.0.0/24
- RDS-SG
- MySQL (3306)
- Web-DMZ
- Web-DMZ
- Create our Elastic Load Balancer
- EC2 > Load Balancers
- Public facing
- All availability zones
- Security Group
- Web-DMZ
- Configure Routing
- Target group
- Target group=New target group
- Name=MyWordpressServers
- Health checks
- healthy.html
- Target group
- Default everything else and [Create]
- Setup S3 for our Code
- Storage > S3
- tas-wordpress
- tas-media
- Storage > S3
- Setup CloudFront
- Networking > CloudFront > New Distribution > Web
- Origin Settings
- tas-media
- Restrict bucket access=Yes
- Origin Access Identity=Create a New Identity
- Grant Read Permissions=Yes
- Leave everything else default and [Create Distribution]
- Setup RDS
- Databases > RDS > [Launch a DB Instance]
- MySQL > [Select]
- Production (For Multi AZ)
- Specify DB Details
- Multi-AZ=Yes
- VPC Security Group=RDS-SG
- Settings
- DB Name/Username/PW=taswp123
- [Next Step]
Part 2 – Setting up EC2
https://www.udemy.com/aws-certified-solutions-architect-associate/learn/v4/t/lecture/5028338?start=0
- Setup DNS
- Networking > Route53 > Select Domain > Add Alias to ELB & Save
- Create EC2 Instances
- EC2 > Launch Instance
- Amazon Linux AMI
- t2.micro
- Default VPC
- S3-Admin Role
- Web-DMZ Security Group
- EC2 > Launch Instance
- Setup the instance
- yum update -y
- Install
- httpd
- php
- php-mysql
- stress (for stress testing)
- Update /ect/httpd/conf/httpd.conf
- AllowOverride ALL
- Create healthy.html
- echo “I’m healthy”> /var/www/html/healthy.html
- Install WordPress
- wget https://wordpress.org/latest.tar.gz
- tar -xzf latest.tar.gz
- cp -r wordpress/* /var/www/html/
- -or- cp -r wordpress/* .
- Clean up unused files
- rm -rf wordpress
- rm -rf latest.tar.gz
- Set /wp-content for read-write
- chmod -R 755 wp-content
- chown -R apache:apache wp-content
- Start Apache and set to start on boot
- service httpd start
- chkconfig httpd on
- Configure the Elastic Load Balancer
- Default target group=MyWordpressServers
- Edit target group
- Health checks
- Healthy threshold=2
- Unhealthy threshold=2
- Timeout=5
- Interval=6 (must be longer than the Timeout)
- Register the instance
- {Targets} [Edit]
- Select the Instance > [Add to Registered] > [Save]
- Health checks
Part 3 – Adding Resilience and CloudFront
https://www.udemy.com/aws-certified-solutions-architect-associate/learn/v4/t/lecture/5028344?start=0
Backup our data to S3
aws s3 cp --recursive /var/www/html s3://data-bucket-name
Copy all media files to S3
aws s3 cp --recursive /var/www/html/wp-content/uploads s3://media-bucket-name
This command will re-copy every thing every time it is ran. Better to use the sync command.
aws s3 sync --delete /var/www/html/wp-content/uploads s3://media-bucket-name
Create .htaccess rewrite rule
Options +FollowSymlinks
RewriteEngine on
rewriterule ^wp-content/uploads/(.*)$ http://d2lf6ybul99vzg.cloudfront.net/$1 [r=301,nc]
Part 4 – Setting up our AMIs
https://www.udemy.com/aws-certified-solutions-architect-associate/learn/v4/t/lecture/7244328?start=0
This section did not work for me! No matter what I did, the URL remained the one in the database. I ended up editing my wp-config.php files and adding the appropriate lines:
“Write” Instance
“Write” Instance
define('WP_SITEURL','http://write.thomasroberts.name');
define('WP_HOME','http://write.thomasroberts.name');
“Production” Instance
define('WP_SITEURL','http://thomasroberts.name');
define('WP_HOME','http://thomasroberts.name');
Next, I removed the crontab line that said to download the code on “Production”
#*/5 * * * * root aws s3 sync --delete s3://thomasandsofia-east1 /var/www/html
Finally, I created the AMIs for both instances. So far, so good!
Step 5 – Create Launch Configurations and Auto-Scaling Groups
** Make sure you add the desired subnets when creating an Auto Scaling Group!