Training Docs
https://zenpacks.zenoss.io/zdk/dev-env/
2:36
NetBotz Device:
- IP: 10.90.34.172
- Port: 1024
- Version: 2c
- Community: netbotz
Day 1 – 5 hrs
No sound for 1st 7 minutes
- Video Link
- #y*26Psp
Times:
- 0:28:00 Creating ZenPack (CLI)
- X:XX:00 Creating a Monitoring Template (UI)
- 1:06:00 Create Data Point (UI)
- Includes how to translate a MIB Definition to an OID (CLI)
- 1:12:00 Create Thresholds (UI)
- 1:17:00 Graphs (UI)
- 1:25:00 Data Point formatting
- 1:28:00 Testing the template (CLI)
- There are issues….
- 1:06:00 Create Data Point (UI)
- Export The ZenPack 1:40:00
- Break: 1:45:00 – 2:01:00
- Create ZenPack via CLI
- 2:10:00 edit zenpacks.yaml
Notes:
- Use zenjobs instead of zenhub for testing `/z` mount point.
- Could not get netsnmp to work. Use the target device posted above.
#Nexus 5k v3
snmpwalk -v3 -u V3User -l authPriv -a MD5 -A AuthPassword -x DES -X PrivPassword 10.171.100.94 system

#Linux Public
snmpwalk -v2c -c public 10.90.35.84 system
NetSNMP: 0:26:00
- Unable to install Netbots, so will use the devices above and hope they work for the class.
Creating a ZenPack
- Video: 0:28:00
- Documentation: https://zenpacks.zenoss.io/zdk/get-started/
- Documentation is incorrect. You cannot view the YAML file yet.
# ~ 60 seconds each command
zenpacklib --create ZenPacks.training.NetBotz
#install in link mode.  Only for creating zenpacks.
# this uses the source instead of egg files
zenpack --link --install ZenPacks.training.NetBotz
#
serviced service restart zope
Note: Normally for ZenPack changes we would restart everything, but for the class will do the minimal to save time.
serviced service restart zenoss.cse/zenoss
# You should never need to restart infrastructure services!
Create the .egg file
cd /z/ZenPacks.training.NetBotz
python setup.py bdist_egg

# The resulting .egg file will be found:
# /z/ZenPacks.training.NetBotz/dist
Add a Device Class to a ZenPack (UI)
- Create the Device Class
- Highlight the Device Class via the Infrastructure tab
- Click the lower left gear icon and select “Add to ZenPack…”
- Select your ZenPack and click [ Submit ]
Add a monitoring template and Bind to device class
Add the Template
Advanced > Monitoring Templates > [+] Add a monitoring template
- Give it a name (NetBotzDevice)
- Create at the /NetBotz device class level
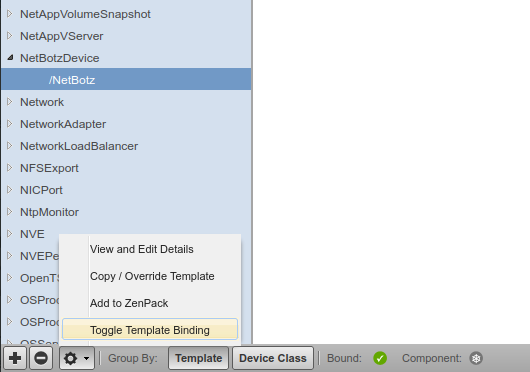
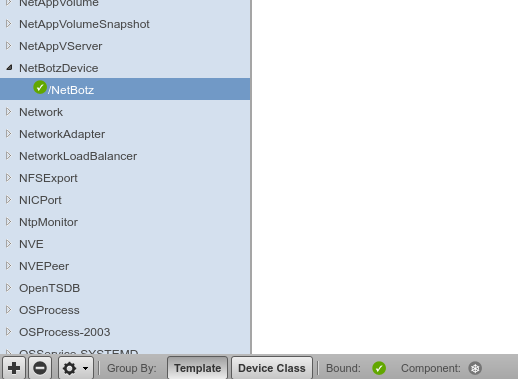
Bind it to the Device Class
- Method 1:
- Refresh browser to make sure new template is there
- Select the NetBotz device class under the /NetBotzDevice template.
- Click the gear icon in the bottom left corner and select “Toggle Template Binding”
- Refresh browser again
- Upon success, you’ll see a green checkmark next to the /Netbotz device class
- Method 2:
- Click Infrastructure
- Select the NetBotz device class > Details
- Click the gear icon in the botton left corner and select “Bind Templates”
- Select the NetBotzDevice template
- [ Save ]
- Return to Advanced > Monitoring Templates and click the /Netbotz device class under the NetBotzDevice template.
- Click Infrastructure
Finding SNMP Values to add
Export the ZenPack (UI)
- Advanced > Click ZenPack link
- Verify Device Class and correct templates applied
- Vague. You’ll need to look at the files.
- Lower left gear icon > Export ZenPack > Export
- No need to download at this time. The file is on the system
- .egg File is located in /z/ZenPacks.COMPANY.ZENPACK_NAME/dist/
Create ZenPack via CLI
02:01:20 – Starting with the ZenPack created via the UI.
EZ Environmental Variables (Optional)
export ZP_TOP_DIR=/z/ZenPacks.COMPANY.ZENPACK_NAME
export ZP_DIR=$ZP_TOP_DIR/ZenPacks/COMPANY/ZENPACK_NAME
For my lab: I’ll need to copy/paste this every time I log back in.
export ZP_TOP_DIR=/z/ZenPacks.training.NetBotz
export ZP_DIR=$ZP_TOP_DIR/ZenPacks/training/NetBotz
Notes:
- Only files in the ZenPacks.COMPANY.ZENPACK_NAME/ZenPacks folder will be included in the ZenPack.egg. Anything above that will be ignored.
- This is set in the MANIFEST.in file
- ZenPack names can go as many layers deep at required but not recommended to go past 4.
- Extra typing and not much to gain beyond that.
Directory and File Descriptions
$ZP_TOP_DIR/ZenPacks/COMPANY/ZENPACK_NAME/
- zenpack.yaml
- Currently only has ZP name. Most work will be done here
- /datasources:
- /lib: list additional libraries
- /libexec: scripts that the ZP needs to run
- /migrate: Advanced. No need for this now
- /modeler
- /plugins
- /objects: Should contain an .xml file with what we did via the UI, but I don’t have it 🙁
- /parsers: Custom parsing scripts
- /resources: Mostly Javascript
- /skins: Obsolete
- /tests:
- /thresholds:
- zenpack.yaml
Edit zenpack.yaml
https://zenpacks.zenoss.io/zdk/start/snmp/device-modeling/
name: ZenPacks.training.NetBotz

classes:
  NetBotzDevice:
    base: [zenpacklib.Device]
    label: NetBotz
    properties:
      temp_sensor_count:
        type: int

device_classes:
  /NetBotz:
    zProperties:
      zPythonClass: ZenPacks.training.NetBotz.NetBotzDevice
      zSnmpMonitorIgnore: false
      zCollectorPlugins:
        - training.snmp.NetBotz
        - zenoss.snmp.NewDeviceMap
        - zenoss.snmp.DeviceMap
        - zenoss.snmp.InterfaceMap
Save the file and reinstall the ZenPack
zenpack --link --install $ZP_TOP_DIR
serviced service restart zope
# or restart everything!
serviced service restart zenoss.resmgr/zenoss
Note: If you installed the ZenPack using –link, you should continue to do so.
Update the device’s properties
Note: Ignore the video and documentation here… does not work, but keep following along until you use the UI.
Because the device and device class existed before the new zenpack properties were installed, it will not automatically obtain these values.
- Move the device to a new device class /Ping, /Http, etc.)
- Delete the NetBotz device class
- Reinstall the ZenPack as shown above
- Restart Zope
- Move the device back to the recreated device class.
Create a Modeler Plugin
Create the Modeler plugin path
mkdir -p $ZP_DIR/modeler/plugins/training/snmp
Touch each file with the dunder-init files
These empty files are required for the folders to be picked up by the build system.
touch $ZP_DIR/modeler/__init__.py
touch $ZP_DIR/modeler/plugins/__init__.py
touch $ZP_DIR/modeler/plugins/training/__init__.py
touch $ZP_DIR/modeler/plugins/training/snmp/__init__.py
Create the Modeler file and add the content
Note: The name of the class must match the name of the file!
nano $ZP_DIR/modeler/plugins/training/snmp/NetBotz.py
...
from Products.DataCollector.plugins.CollectorPlugin import (
    SnmpPlugin, GetTableMap,
    )

class NetBotz(SnmpPlugin):
    snmpGetTableMaps = (
        GetTableMap(
            'tempSensorTable', '1.3.6.1.4.1.5528.100.4.1.1.1', {
                '.1': 'tempSensorId',
                }
            ),
        )

    def process(self, device, results, log):
        temp_sensors = results[1].get('tempSensorTable', {})

        return self.objectMap({
            'temp_sensor_count': len(temp_sensors.keys()),
            })
After adding the new modeler plugin to the device class and remodeling the device, you’ll be able to view the new property in zendmd. Next, we’ll add the property to the device overview page.
Update the device overview to show the new property
Create the directory to store the Javascript:
This should already exist…
mkdir -p $ZP_DIR/resources
Create a file with the javascript
nano $ZP_DIR/resources/device.js
and add the following content
Ext.onReady(function() {
    var DEVICE_OVERVIEW_ID = 'deviceoverviewpanel_summary';
    Ext.ComponentMgr.onAvailable(DEVICE_OVERVIEW_ID, function(){
        var overview = Ext.getCmp(DEVICE_OVERVIEW_ID);
        overview.removeField('memory');

        overview.addField({
            name: 'temp_sensor_count',
            fieldLabel: _t('# Temperature Sensors')
        });
    });
});
Component Modeling
3:03:00 Component Modeling Documentation
Search the MIB for things that might be important to you
smidump -f identifiers /usr/share/snmp/mibs/NETBOTZV2-MIB.mib | grep -Ei temp
Walk the row looking for these component attributes
snmpwalk -v2c -c netbotz -m all 10.90.34.172:1024 1.3.6.1.4.1.5528.100.4.1.1.1
Filter this down to just one component
snmpwalk -v2c -c netbotz -m all 10.90.34.172:1024 1.3.6.1.4.1.5528.100.4.1.1.1 | grep 21604919
Results:
NETBOTZV2-MIB::tempSensorId.21604919 = STRING: nbHawkEnc_1_TEMP
NETBOTZV2-MIB::tempSensorValue.21604919 = INTEGER: 265
NETBOTZV2-MIB::tempSensorErrorStatus.21604919 = INTEGER: normal(0)
NETBOTZV2-MIB::tempSensorLabel.21604919 = STRING: Temperature
NETBOTZV2-MIB::tempSensorEncId.21604919 = STRING: nbHawkEnc_1
NETBOTZV2-MIB::tempSensorPortId.21604919 = STRING:
NETBOTZV2-MIB::tempSensorValueStr.21604919 = STRING: 26.500000
NETBOTZV2-MIB::tempSensorValueInt.21604919 = INTEGER: 26
NETBOTZV2-MIB::tempSensorValueIntF.21604919 = INTEGER: 79
NETBOTZV2-MIB::tempSensorEntry.10.21604919 = Counter32: 21604919
Identify items to include in the Model
These are items that rarely change
- tempSensorId
- tempSensorEncId
- tempSensorPortId
Note: Coincidence that these are all strings?
Update the YAML file to add the component
nano $ZP_DIR/zenpack.yaml
add the following:
NetBotzTemperatureSensor:
    base: [zenpacklib.Component]
    label: Temperature Sensor
    properties:
      enclosure:
        label: Enclosure

      port:
        label: Port

class_relationships:
  - NetBotzDevice 1:MC NetBotzTemperatureSensor
Note:
- 1:MC says “A single NetBotzDevice may have many NetBotzTemperatureSensor components”
- The properties “enclosure” and “port” do not need to be ‘typed’ as strings. Strings are the default type.
- Look at our previous “temp_sensor_count” which was ‘typed’ as ‘int’
- There is no need to create properties for ‘id’ nor ‘title’ since these are included with the zenpacklib.component
Reinstall the ZenPack and restart Zope
This is always required to pick up yaml file changes.
# Reinstall the ZenPack
zenpack --link --install $ZP_TOP_DIR
# OR (sweet trick here)
history | grep install
!HISTORY_NUMBER_YOU_WANT_TO_RUN

# restart Zope
serviced service restart zope
Test if the component class exists with zendmd
from ZenPacks.training.NetBotz.NetBotzTemperatureSensor import NetBotzTemperatureSensor
sensor = NetBotzTemperatureSensor('test_sensor_01')
device = find("Netbotz01")
device.netBotzTemperatureSensors._setObject(sensor.id, sensor)
sensor = device.netBotzTemperatureSensors._getOb(sensor.id)
print sensor
print sensor.device()
This will error. We need to run the following:
device.buildRelations()
commit()
Now rerun the above code and it will work
Update (Replace) the Modeler Plugin
nano $ZP_DIR/modeler/plugins/training/snmp/NetBotz.py
Replace everything with the following contents:
from Products.DataCollector.plugins.CollectorPlugin import (
    SnmpPlugin, GetTableMap,
    )


class NetBotz(SnmpPlugin):
    relname = 'netBotzTemperatureSensors'
    modname = 'ZenPacks.training.NetBotz.NetBotzTemperatureSensor'

    snmpGetTableMaps = (
        GetTableMap(
            'tempSensorTable', '1.3.6.1.4.1.5528.100.4.1.1.1', {
                '.1': 'tempSensorId',
                '.5': 'tempSensorEncId',
                '.6': 'tempSensorPortId',
                }
            ),
        )

    def process(self, device, results, log):
        temp_sensors = results[1].get('tempSensorTable', {})

        rm = self.relMap()
        for snmpindex, row in temp_sensors.items():
            name = row.get('tempSensorId')
            if not name:
                log.warn('Skipping temperature sensor with no name')
                continue

            rm.append(self.objectMap({
                'id': self.prepId(name),
                'title': name,
                'snmpindex': snmpindex.strip('.'),
                'enclosure': row.get('tempSensorEncId'),
                'port': row.get('tempSensorPortId'),
                }))

        return rm
Notes:
- prepId turns a string into something URL friendly
- These should also be strings so they remain unique
Restart Zope and zenhub to push the changes
Remodel the device
You should now see the temperature sensors as components of the device.
- If not, make sure the modeler plugin didn’t fall off the device class somehow.
Add a Monitoring Template
Note: Recommended to do this via the YAML file, but will do this in the UI instead.
Create the template as outlined in the doc.
Traps
3:51:15 Traps Documentation
This isn’t really part of the ZenPack, but good to know.
Push the MIB file to the collectors
https://zenoss.atlassian.net/wiki/spaces/~124743625/pages/1062961222/Install+MIBs#Instructions
Note: Recall the MIB file is /usr/share/snmp/mibs/NETBOTZV2-MIB.mib
Simulate a trap
Get the collector pool’s trap vip
sudo iptables -L FORWARD -n | grep 162
# ACCEPT udp -- 0.0.0.0/0 172.17.0.55 udp dpt:162 /* serviced: DO_NOT_REMOVE */
Send the trap using the MIB Friendly description
Note: You can get the Friendly OID names from Advanced > MIBs > SELECT_MIB > Dropdown = ‘Traps’
sudo snmptrap 172.17.0.55 0 NETBOTZV2-MIB::netBotzTempTooHigh
Commands
Create ZenPack .egg file
-
-
-
-
-
-
-
- file will be in ./dist folder
-
-
-
-
-
-
cd /z/ZENPACK_NAME
python setup.py bdist_egg
Add a device
z zendisc run --deviceclass=/DEVICECLASS --device=IP.ADD.RE.SS
SNMP Walk
snmpwalk -v2c -c public 10.90.35.84 1.3.6.1.2.1.1.3.0