< 6 Docker Registry | 8 Docker on Mac and Windows >
59% Complete
33: Docker Engine
https://www.udemy.com/learn-docker/learn/lecture/15829078#content
Architecture
- The “Engine” is the host with Docker installed on it.
- Docker Daemon
- Backgroud process that manages the
- Images
- Containers
- Volumes
- Networks
- Backgroud process that manages the
- REST API server
- Provides the interface to talk to the daemons
- Docker CLI
- Command line interface
- Uses the REST API to talk to the daemon
- Does not need to be installed on the same Host!
- Docker Daemon
docker -h=<remote-docker-engine>:2375 run <image>
Containerization
- Docker uses namespaces to isolate
- workspace
- process ids
- networks
- interprocess communications
- mounts
- Unix timesharing systems
Process ID namespaces PID
- When a Linux system boots up, it starts with a single process with an ID of 1.
- This is the ‘root’ process.
- The root process starts up all the other processes.
- All process IDs are unique. No two processes can share an ID
- To list all the process, use the
pscommand.
- A container is like a child system in the current system
- Needs to think it is an independent system with its own root process with a process ID of 1.
- However, processes running inside the container are actually processes running inside the host.
Process ID Namespaces
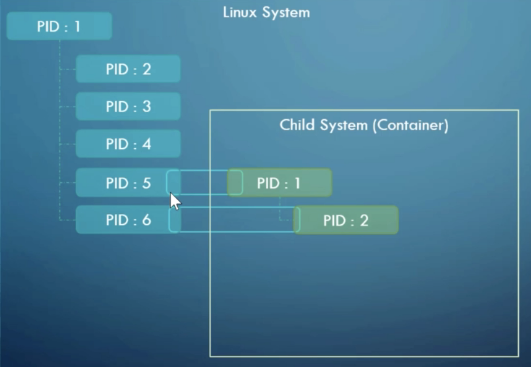
- Each process id namespace has it’s own set of processes and each can have it’s own root process with a process ID of 1.
- A process started in a contain is just another process on the host machine and will get the next available process ID.
- It will also get the next available process id from the container. This is how the container can have it’s own root process and process list.
- To verify this
- Check the last PID on the host.
- Now run a docker container and then run PS to see the name of the service with PID 1.
- Run PS again on the host. You’ll see the same process name, but with a different ID
cgroups – Control Groups
- By default, there are no restrictions regarding the amount of resources a container may use.
- Control Groups are used to restrict the amount of hardware resources allocated to each container.
- In the example below, we’ll restrict the CPU to 50% and the RAM to 100MB.
docker run --cpus=.5 --memory=100m ubuntu
Namespace Demo
https://www.udemy.com/learn-docker/learn/lecture/15829688#content
Prove Processes are on both the host and container and they have different PIDs.
Docker Storage
https://www.udemy.com/learn-docker/learn/lecture/15829082#content
Docker File Systems
- /var/lib/docker
- aufs
- containers
- image
- volumes
Layered Architecture
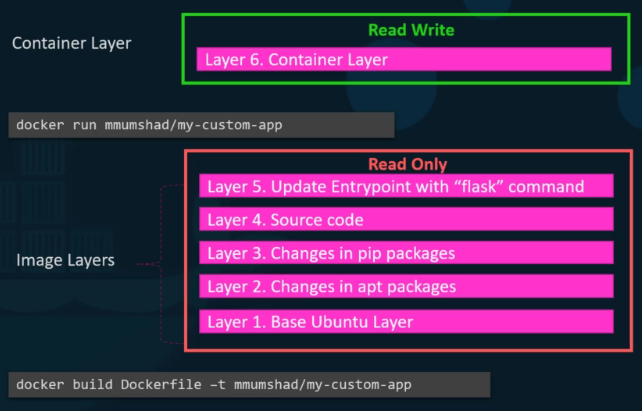
- Docker Images are created in a layered architecture with only the changes to the layer above it applied,
- FROM ubuntu
- RUN apt-get update -y
- …
- This method cuts disk space and speeds creation time.
- These layers are read only
- When a container is created, it uses the Image layers, then creates a new ‘container’ layer on top of them.
- The image layers are then copied to the Container layer.
- This layer is lost when the container is exited.
Volumes
Create a persistent volume
docker volume create my_volume
- This will create a volume at /var/lib/docker/volumes/my_volume
To use your volume,
docker run -v my_volume:/docker/container/path
- If you do not create the volume first, it will create it for you.
Using bind points
- Use this system to mount specific drive locations, such as an external SSD
- Simply identify the full path to the location.
Example:
- The default location for these volumes is /var/lib/docker/volumes
- If you do not create the folder prior to running the command, it will create it for you.
docker run -v /persistent/folder:/docker/container/folder <image>
docker run --mount type=bind,source=/persistent/folder,target=/docker/container/folder <image>
- –mount is preferred method over -v
- It is more verbose and more inline with JSON key=value pairs.
- See below for volume vs bind types.
- Using this system will mount the /persistent/volume/ folder to the docker container at the location specified.
- When the container is destroyed, the volume will remain and any data written to it by the container will not be lost.
Volume Mounting vs. Bind Mounting
Volume mounting: Not specifying a direct path such that docker uses the default /var/lib/docker/volumes folder.
Bind Mounting: Specifying an existing path from the root folder.
Storage Drivers
Supported drivers:
- Storage drivers are responsible for creating the folders.
- Docker will chose the best storage drive depending on the underlying operating system.
- AUFS
- ZFS
- BTRFS
- Device Mapper
- Overlay
- Overlay2
36: Docker Storage Demo
https://www.udemy.com/learn-docker/learn/lecture/15829694#content
Get Docker Info
docker info
Client:
 Debug Mode: false

Server:
 Containers: 1
  Running: 1
  Paused: 0
  Stopped: 0
 Images: 48
 Server Version: 19.03.8
 Storage Driver: overlay2
  Backing Filesystem:
  Supports d_type: true
  Native Overlay Diff: true
 Logging Driver: json-file
 Cgroup Driver: cgroupfs
 Plugins:
  Volume: local
  Network: bridge host ipvlan macvlan null overlay
 Log: awslogs fluentd gcplogs gelf journald json-file local logentries splunk syslog
 Swarm: inactive
 Runtimes: runc
 Default Runtime: runc
 Init Binary: docker-init
 containerd version: 7ad184331fa3e55e52b890ea95e65ba581ae3429
 runc version: dc9208a3303feef5b3839f4323d9beb36df0a9dd
 init version: fec3683
 Security Options:
  apparmor
  seccomp
   Profile: default
 Kernel Version: 5.3.0-46-generic
 Operating System: Ubuntu 18.04.4 LTS
 OSType: linux
 Architecture: x86_64
 CPUs: 2
 Total Memory: 1.941GiB
 Name: docker01
 ID: TLSU:IN33:XSIE:3LS5:VIV7:IDY2:DW6M:VKTL:27JV:PODP:6PYQ:4TDT
 Docker Root Dir: /var/lib/docker
 Debug Mode: false
 Registry: https://index.docker.io/v1/
 Labels:
 Experimental: false
 Insecure Registries:
  127.0.0.0/8
 Live Restore Enabled: false

WARNING: No swap limit support
To see how an image is built
docker history ImageId
Points to ponder
- When making changes to an image build:
- Steps that have not changed, up to the change, are used from cache
- Once a step changes, that step, along ALL following steps are recreated.
- This includes following steps that may or may not have changed.
- If only a minor change is made, the original and new image will display approximately the same size.
- This does not mean the total disk space consumed is the total of the two.
- Since many of the layers may be shared, those layers are NOT replicated to create the new image.
- The image size represents the amount of space required if you were to pull it to another system.
- To see total disk space used, run the docker system df command.
docker system df <-v>
Example:
root@docker01:/var/lib/docker/overlay2# docker images
REPOSITORY                  TAG                 IMAGE ID            CREATED             SIZE
example-voting-app_worker   latest              b22add4acbb9        21 hours ago        1.72GB
example-voting-app_result   latest              4fb7cc75482d        21 hours ago        146MB
example-voting-app_vote     latest              a027647f0ba4        21 hours ago        84.2MB
result-app                  latest              86b97d2a7378        22 hours ago        146MB
voting-app                  latest              b39ff7f319fa        22 hours ago        84.2MB
python                      2.7-alpine          8579e446340f        23 hours ago        71.1MB
redis                       alpine              f727a777bc34        25 hours ago        29.8MB
worker-app                  latest              4af0bf7ffcd1        31 hours ago        1.72GB
                                    8689b56902f4        33 hours ago        84.1MB
wordpress                   latest              895c3d7568db        4 days ago          540MB
postgres                    latest              4b59e7d1ba1c        4 days ago          314MB
redis                       latest              975fe4b9f798        4 days ago          98.3MB
node                        10-slim             af55a61c87a1        5 days ago          135MB
postgres                    9.4                 ed5a45034282        2 months ago        251MB
registry                    2                   708bc6af7e5e        2 months ago        25.8MB
microsoft/dotnet            2.0.0-sdk           fde8197d13f4        2 years ago         1.64GB
# ~4.0GB
root@docker01:/var/lib/docker/overlay2# docker system df
TYPE                TOTAL               ACTIVE              SIZE                RECLAIMABLE
Images              16                  1                   3.246GB             3.22GB (99%)
Containers          1                   0                   0B                  0B
Local Volumes       19                  0                   979.2MB             979.2MB (100%)
Build Cache         0                   0                   0B                  0B
37: Lab
https://www.udemy.com/course/learn-docker/learn/lecture/15829086#content
38: Docker Networking
https://www.udemy.com/course/learn-docker/learn/lecture/7894034#content
Default Networks
- Bridge
- docker run IMAGE
- By default, all docker images get attached to this network
- Usually 172.17.x.x
- Containers can access each other via this network.
- To access these containers from the outside world, map the ports to the ports on the host.
- None
- docker run –network=none IMAGE
- No access to the host network, nor to any other container.
- Host
- Docker run –network=host IMAGE
- This removes distinction between the host and the container.
- Removes ability to run multiple containers on the same port.
Create custom networks
docker network create --driver bridge --subnet 182.18.0.0/16 custome-isolated-network
To view all networks:
docker network ls
To find additional information about a network
docker network inspect NETWORK
To view a container’s network information
(you should already know this one)
docker inspect CONTAINER
...
            "Gateway": "172.17.0.1",
            "GlobalIPv6Address": "",
            "GlobalIPv6PrefixLen": 0,
            "IPAddress": "172.17.0.2",
            "IPPrefixLen": 16,
            "IPv6Gateway": "",
            "MacAddress": "02:42:ac:11:00:02",
            "Networks": {
                "bridge": {
                    "IPAMConfig": null,
                    "Links": null,
                    "Aliases": null,
                    "NetworkID": "a09b6de4c1e5a5cd4eb5e4537d80c603c9ea4491c2f466deba1291d3d52aecf8",
                    "EndpointID": "1528588ed06a50c1055bb8407609f7f6e48fee5e1363283744898b67e5f66699",
                    "Gateway": "172.17.0.1",
                    "IPAddress": "172.17.0.2",
                    "IPPrefixLen": 16,
                    "IPv6Gateway": "",
                    "GlobalIPv6Address": "",
                    "GlobalIPv6PrefixLen": 0,
                    "MacAddress": "02:42:ac:11:00:02",
                    "DriverOpts": null
Embedded DNS
Always use the container names to connect to one another!
- All containers have built in DNS that allows them to connect to each other via their container names.
- This allows them to re-connect in case of a reboot/shutdown/etc and the containers are not assigned the same IP address they had initially.
- The DNS server is located at 127.0.0.11
39: Labs
https://www.udemy.com/course/learn-docker/learn/lecture/15828672#content